Running on Unreal Engine 5, Titan Quest 2 has released for PC as part of Steam Early Access, at the time of writing. There are bound to be some errors and crashes that PC users will experience, considering the game is still in development. Aside from the usual Unreal Engine errors, like the Out of Video Memory crash, PC users are experiencing the Titan Quest 2 not launching issue. I have compiled a list of fixes that will resolve the crashing at startup issue on your Windows PC.
Verified Fix for Titan Quest 2 Startup Crash on PC
PC users report that Titan Quest 2 keeps crashing at startup. For some players, the game crashes to the desktop and no error message pops up; for others, it crashes at startup, and the Out of Video Memory error pops up.
There are multiple reasons the game is crashing at launch on your PC, like an overclocked graphics card, the game not using the discrete graphics hardware, corrupt or missing system files, issues with the shader cache, and more. The following fixes will resolve the Titan Quest 2 not launching issue on your PC.
Fix #1 – Force Titan Quest II to Run on Dedicated Graphics Hardware
If you are using a gaming laptop and Titan Quest 2 keeps crashing on startup, Windows isn’t switching the GPUs. Gaming laptops use both the integrated graphics card (iGPU) and NVIDIA or AMD discrete graphics card to save battery. Windows switches between the two graphics cards depending on load.
Titan Quest II is crashing on your PC at startup due to Windows not switching the graphics cards and tires to launch the game on the iGPU. You can fix these startup crashes by forcing the game to run on the discrete graphics card. Here is how you can force Titan Quest 2 to run on the dedicated graphics hardware:
- Go to Windows 10/11 settings, go to System, click Display, and go to Graphics.
- Select “Titan Quest II” from the apps and programs list. Click on Options.
- Select the “High Performance” option and save the changes.
- Play Titan Quest II, and the startup crashes are now fixed.


Fix #2 – Ensure Your Graphics Card is Using Stock Clocks
If Titan Quest 2 is crashing at launch on your PC with a UE5 crash or the Out of Video Memory error, it is crashing due to your graphics card’s GPU and Memory clocks. Unreal Engine 5 is quite sensitive to GPU and Memory clock speeds, and can crash due to the slightest overclock.
If you have overclocked your graphics card, revert it to its default GPU and Memory clocks to fix the Titan Quest 2 startup crashes. PC users confirm that using the stock clocks fixes the startup crashes.

Even if you haven’t overclocked your graphics card, it is most likely using higher GPU and Memory clocks than its reference model. Most graphics cards from NVIDIA or AMD AIB partners, like Zotac, use slightly higher GPU and Memory clocks than their respective reference models. These higher clocks are the reason Titan Quest 2 is not launching on your PC and crashes as soon as it starts.
You can fix these startup crashes by forcing your graphics card to use its stock clocks. For NVIDIA, you can do it by enabling the Debug Mode through the NVIDIA Control Panel. As for AMD, you’ll have to manually underclock the GPU clock using Adrenalin Software.
To enable the Debug Mode, open the NVIDIA Control Panel, click the “Help” button from the top menu, and click the “Debug Mode” option. This will force the graphics card to use the reference GPU and Memory clocks for the particular model, and the Titan Quest 2 startup crash is now fixed.

Fix #3 – Repair System Files and Install Visual C++ Components
The reason Titan Quest II keeps crashing on startup on your Windows PC is due to missing or corrupt Visual C++ components and system files. You can fix the issue by running the SFC and DISM scans to repair system files and installing or repairing the missing or damaged C++ components.
Install or Repair Windows Visual C++ Components
Microsoft Visual C++ is necessary to run games on a Windows PC. Since they are a prerequisite, having Visual C++ components damaged or missing results in games not launching. You can run installers for Visual C++ Redistributables to fix the Titan Quest 2 crashing at startup issue. Here is how you can run the installers:
- Go to the Steam Library and type “Steamworks” in the search bar.
- Right-click “Steamworks Common Redistributables” > Manage > click “Browse local files”.
- Open _CommonRedist\vcredist in the explorer window that opens on your screen.
- You will get a list of folders with names in years starting from 2010.
- Open each folder one by one and run the VC_redis for both x64 and x86 versions.
- Repair or install Visual C++ Redistributables.
- Launch Titan Quest II, and it won’t crash at launch.


Steam deletes installers after a certain time, and you might find some folders empty. In that case, you can manually download installers for Visual C++ Redistributables and install them. Ensure that you download and install both x86 and x64 versions.

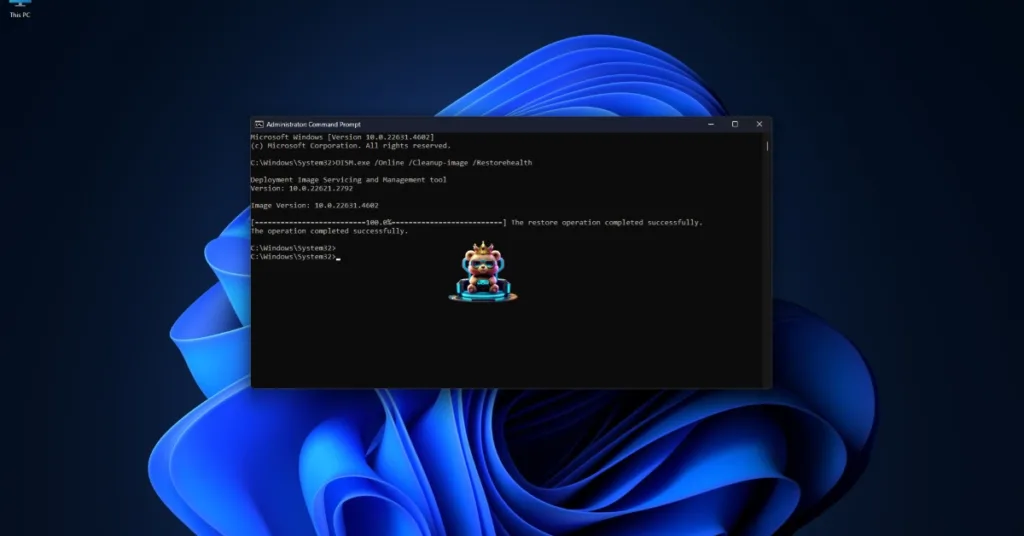
Repair System Files
Windows has built-in tools that scan for missing or corrupt system files and recover them. SFC and DISM scans are among those tools. Run these scans to repair system files, which will fix the Titan Quest 2 not launching issue on your Windows PC. Here is how you can run these scans:
- Press the Windows key on your keyboard, type “cmd”, and run Command Prompt as an administrator.
- Type sfc /scannow and hit Enter.
- Windows will run a scan. Let it complete fully.
- After the first scan is complete, type DISM.exe /Online /Cleanup-image /Restorehealth and press Enter again.
- Let Windows complete this scan as well.
- Run Titan Quest II, and it will launch without any errors.
Fix #4 – Clear NVIDIA Shader Cache and Expand It
Being an Unreal Engine 5 game, Titan Quest II relies on shaders for its performance and visuals. For the shaders to be quickly usable, the game creates a shader cache. The cache is either corrupt or too small is size, which is crashing Titan Quest 2 at launch. You can fix these startup crashes by clearing the cache and increasing its size. Here is how you can clear the NVIDIA Shader cache and increase its size:
- Open the NVIDIA Control Panel.
- Click the “Manage 3D Settings” option from the left menu.
- Go to the “Global settings” tab.
- Scroll down to the “Shader Cache Size” setting.
- Select “Disable” from the list of options, and apply the changes.
- Restart your PC, open the NVIDIA Control Panel again, and go to the “Shader Cache Size” setting.
- Select 10 GB or higher value for it, and apply the changes.
- Launch Titan Quest 2, and the startup crash issue is now fixed.

There you have it, our Titan Quest 2 fixes for the game not launching issue on Windows PC. If you are experiencing errors and crashes in games, also see our fixes hub for commonly occurring errors for PC.