Want to install Windows 11 on Steam Deck? You are making the best decision for your handheld and overall gaming experience. Why you ask? Well, the Steam OS, while one of the best operating systems, is not often compatible with games due to its Linux base.
That’s where Windows 11 comes in, or Windows 10 for that matter (installation process is the same). Microsoft’s operating system is best for gaming on handhelds which is why Asus ROG Ally and Ally X use Windows instead of Linux.
Installing Windows 11 on Steam Deck means better compatibility with video games, and access to a much larger library of games. You can not only play Steam games but also install Epic Games.
Additionally, you can also install GeForce Now if streaming games is your thing.
Getting Windows on Steam Deck is a multi-step process but before you begin, make sure you have a few things ready.
Preparations To Install Windows 11 On Steam Deck
You’ll need the following items ready before you install Windows 11:
- A USB drive with at least 16GB of storage (USB 3.0 recommended for faster installation).
- A USB-C to USB-A hub with at least three USB-A ports.
- A wired USB mouse and keyboard.
- An Internet connection for downloading necessary files.
- Ensure your Steam Deck is fully updated.
Note: Installing Windows will erase SteamOS. If you wish to dual-boot, additional steps are required, but this guide focuses on a full installation.
I highly recommend that you update your Steam Deck to the latest version if you haven’t already. This is something that would make life easier while installing Windows 11.
Valve has released some updates not long ago to simplify the process of getting Windows 11 on Steam Deck. Not just that but some earlier versions of the Steam Deck OS won’t even let you install the Steam Deck OS.
Another thing to keep in mind is that you must keep your Steam Deck fully charged for the process since we are using a USB for the installation and while the USB is connected, the Steam Deck can’t be charged.
You can bypass this problem if you own the official Steam Deck Dock or a third-party dock like JSAUX Docking Station. Both items can be purchased from Amazon or other tech stores you may prefer.
Make A Bootable Windows 11 USB Drive
Now that you know the items you need, let’s start by discussing how to use those items. The USB drive is the main source of installation. We need to turn the USB drive into a bootable Windows 11 flash drive.
To do this, you first need to download Windows 11 installation media on a separate Windows PC or laptop.
Go to the official website that I’ve linked above. There are three options there, but you need to select “Create Windows 11 Installation Media”.
This tool allows you to create a bootable USB flash drive or DVD that contains the installation files necessary for Windows 11. You can also select the “Download Windows 11 Disk Image (ISO) for x64 Devices” option but that has additional steps you need to perform so we are going with the Windows 11 Installation Media.
This is the recommended option for creating a bootable USB drive. It simplifies the process by guiding you through the steps to download and prepare the installation media directly.
- Connect the USB drive you want to use for the installation media to your computer. Make sure it has at least 8GB of storage space. Double-click the MediaCreationToolW11.exe file you downloaded to launch the Windows 11 Media Creation Tool.
- In the tool, select the option to create installation media (USB flash drive, DVD, or ISO file) for another PC and click Next.
- Select the USB flash drive option and click Next. The tool will show you a list of connected USB drives. Select the drive you want to use and click Next.
- The Media Creation Tool will now download the necessary files and create a bootable USB drive. This process may take some time depending on your internet speed.
Once the process is complete, click Finish. Your Windows 11 bootable USB drive is now ready to use for installation.
Installing Windows 11 On Steam Deck
Note: The touchscreen does not work during Windows installation on Steam Deck. So, you will need a USB hub to connect keyboard and mouse to the Steam Deck. It some cases the touchscreen does work but it’s a 50/50 chance that it would.
With the bootable USB drive ready, connect it to the Steam Deck to kick start the installation process.
Power off the Steam Deck and hold down the volume button, then press the power button. Continue holding the volume button until the Steam Deck goes into boot screen.
You will find yourself in the Steam Deck Boot Manager. Select USB drive from the boot options to launch the Windows 11 installation process on Steam Deck.
If the Deck asks you to choose some general options like region and language, choose them to your preference and move on.
Click on Install Now and if the installer fails to find the hard drive, do not worry just restart and repeat the process to fix the problem.
You will need an Activision Key (but I think you can add that later too but it’s better to have one just in case the setup doesn’t let you move on) but if you don’t have one select “I don’t have a product key”.
The next screen will ask you to choose a Windows version. You can choose Home or Pro, but I recommend select Pro as it is less bloated which is better for gaming. Also, its key is cheaper if you don’t have a key right now but plan on buying later.
On the next screen you will be asked if you want to install a new version of Windows. Select Install Windows Only.
Now you need to decide where you want to install Windows 11 on Steam Deck. Delete Drive 0 Partition 8 to but know that there is no turning back if you delete these partitions. Your Steam OS is gone!
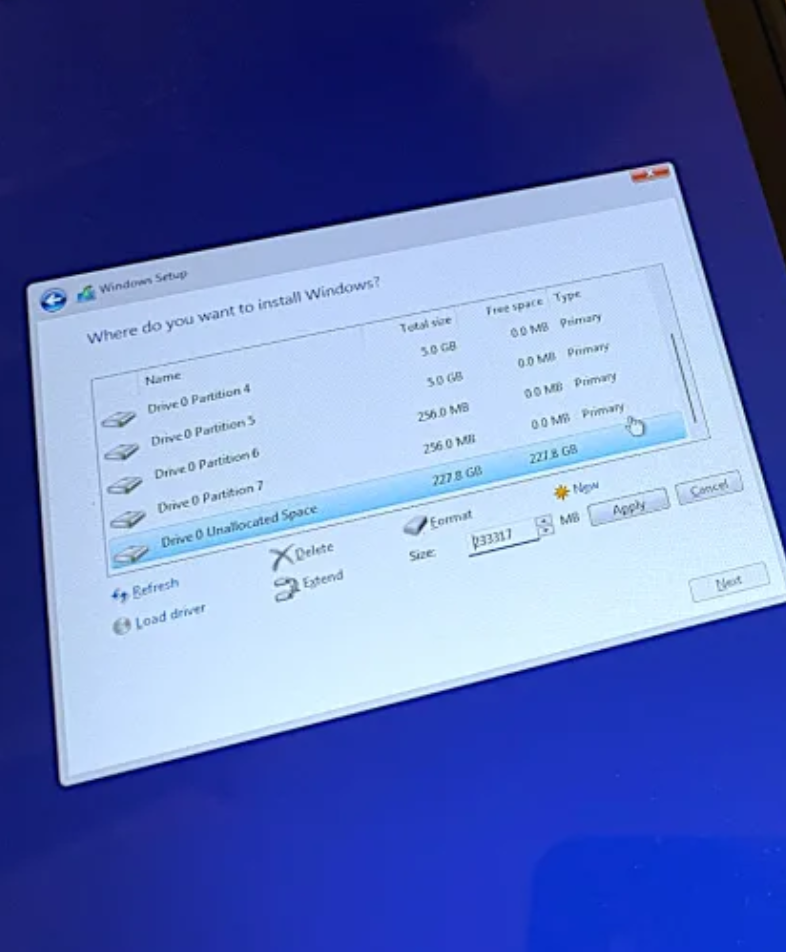
Now select Drive 0 Unallocated Space and then select New. You can then select the size of the partition; I suggest you keep it at default number.
After that you will see Drive 0 Partition 9, select it and press Next to start Windows 11 Installation on Steam Deck.
During the installation process, the Steam Deck may restart a couple of times. The entire process will take a few minutes.
After the process, go through the usual Windows steps of selecting language and regions etc. There are also some options to select a second keyboard layout, what options you choose are up to you as they are not relevent to the installation process but to your own preference.
Feel free to remove the USB drive because we do not need it anymore.
Tip: If at any point the automatic reboot gets stuck, enter the Steam Boot Manager again but holding down the volume bottom and pressing the Power Button. Then choose your newly minted Windows partition to boot the device. It should fix the problem.
How to Change Vertically Aligned Display on Steam Deck’s Windows 11
If your display is in portrait mode after installing Windows 11 on your Steam Deck, you can easily switch it back to landscape mode.
- Press Windows + I to open the Settings app.
- Click on System on the left sidebar.
- Select Display from the options on the right.
- Scroll down to the Scale and layout section.
- Find the Display orientation dropdown menu.
- Select Landscape from the options (the available options typically include Landscape, Portrait, Landscape (flipped), and Portrait (flipped)).
After selecting Landscape, you may be prompted to confirm the changes. Click Keep changes to apply the new orientation.
That’s it! Enjoy your Windows 11 on Steam Deck. Oh, and you’ll need to download Steam again to play games.