Running on RE Engine, Monster Hunter Wilds (MHW) looks and plays incredible. However, the game has some severe performance issues on PC, among other issues. PC users report experiencing crashes at startup, game not connecting to online servers, Fatal D3D errors, and more. I have compiled a list of fixes that will resolve the Monster Hunter Wilds Fatal D3D error on your Windows PC.
Working Fixes for Monster Hunter Wilds Fatal D3D Errors
PC users report that Monster Hunter Wilds is crashing randomly during gameplay and one of the following Fatal D3D errors pops up:
Fatal D3D error (26, DXGI_ERROR_DEVICE_RESET, 0x887a0007)
Fatal D3D error (25, DXGI_ERROR_DEVICE_HUNG, 0x887a0006)
Fatal D3D error (6, E_OUTOFMEMORY, 0x8007000e)
There are multiple reasons for these Fatal D3D errors to pop up like overclocked GPU, not enough virtual memory, unlocked FPS, and more. The following fixes will resolve the Monster Hunter Wild Fatal D3D crash on your PC.
Fix #1 – Run Monster Hunter Wilds with DirectX 11
Monster Hunter Wilds requires DirectX 12 to run, but it also supports DirectX 11. The DX12 implementation is causing the game to crash during gameplay with the ” DXGI_ERROR_DEVICE_HUNG” Fatal D3D error. While the game does not have a toggle to switch DirectX on PC, you can force Dx11 to fix the fatal D3D error. Here is how to force Monster Hunter Wilds to use DirectX 11 and fix the fatal error crash:
- Right-click Monster Hunter Wilds in your Steam library and select properties.
- Go to the “General” tab and type -force-d3d11 under “Launch Options”.
- Play MHW and the Fatal D3D error is now fixed.

Fix #2 – Increase Virtual Memory
You are experiencing the E_OUTOFMEMORY Fatal D3D error with Monster Hunter Wilds due to virtual memory not being enough. You can fix the error by manually increasing the Virtual Memory size, and here is how to do it:
- Open Windows Settings > System > About > Advanced System Settings.
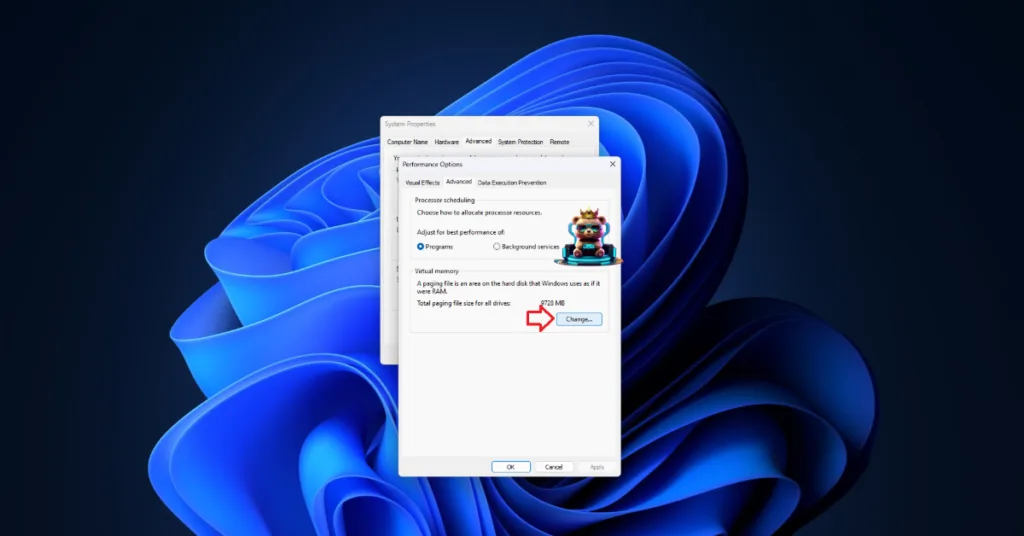
- Click “Settings” under Performance, and go to the Advanced tab in Performance Options.
- Click on “Change” under Virtual memory.
- Uncheck “Automatically manage paging file size for all drives.”
- Select the drive with at least 32 GB of available space.
- Check the Custom size option.
- Input ‘16,384’ for the Initial size and ‘32,768’ for the Maximum size and press OK.
- Restart your PC, Play MHW, and the Fatal D3D error is now fixed.


Fix #3 – Run MHW in Windows 8 Compatibility Mode
Compatibility issues with your current Windows 10 or 11 version is crashing Monster Hunter Wilds during gameplay with the Fatal D3D error. You can fix the error by running the game in compatibility mode for Windows 8, as PC users report that it has worked for them. Here is how to play MHW in Windows 8 compatibility mode:
- Open Steam Library and right-click Monster Hunter Wilds.
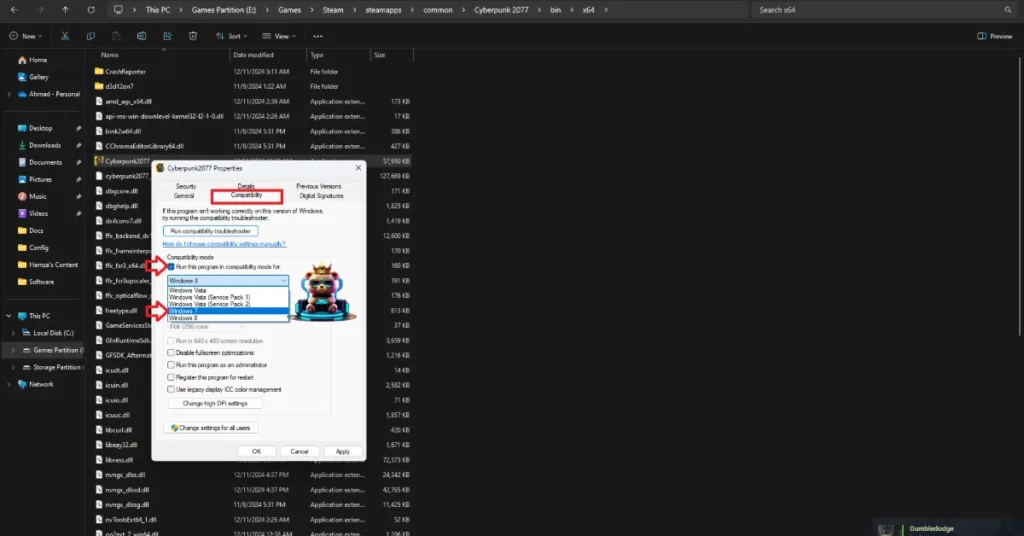
- Hover the mouse cursor over the “Manage” option and click “Browse local files”.
- It will open a new explorer window containing game files.
- Right-click the game executable and click properties.
- Go to the “Compatibility” tab and check the “Run this program in compatibility mode for” option.
- Select Windows 8 from the drop-down menu, and apply the changes.
- Play MHW and the Fatal D3D Error crash is now fixed.

Fix #4 – Underclock Graphics Card or Use the Debug Mode
PC users even with high-end hardware are experiencing random Monster Hunter Wilds Fatal D3D DXGI_ERROR_DEVICE_HUNG crashes. They have fixed this issue by underclocking their graphics card’s GPU clock by 300 MHz. I have also tested it on my PC and doing this resolved the Fatal D3D error. Use MSI Afterburner to underclock your graphics card and the error will be fixed.
However, there is a simple way for Nvidia GPU owners to underclock their graphics cards. Most graphics cards from Nvidia’s AIB partners, like ASUS or Zotac, use higher GPU and Memory clocks than reference models, which is crashing Monster Hunter Wilds with the Fatal D3D error. You can fix it by enabling the Debug Mode through the Nvidia Control Panel.
- Open the Nvidia Control Panel.
- Click the “Help” button at the top.
- Select the “Debug mode” option.
- Play MHW, and the Fatal D3D crashes are now fixed.

What is Debug Mode?
Enabling the Debug Mode in the Nvidia Control Panel forces the graphics cards to use Nvidia’s recommended GPU and Memory clocks. This reduces the load on the graphics card and fixes in-game crashes, Fatal errors, and DXGI errors. You can disable it anytime you want.
Fix #5 – Limit Monster Hunter Wilds’ Max Frame Rate
Playing games with unlocked or high frame rates is the best way to experience them. It not only reduces the input latency but also improves gameplay smoothness. However, playing games at a high FPS puts the GPU and CPU under a lot of stress, which results in games crashing with Fatal or DXGI errors.
If you are playing Monser Hunter Wilds at an unlocked FPS, it is crashing it with the Fatal D3D error. You can fix this issue by limiting the game’s max frame rate. In case you have to disable Vertical Synchronization (vsync), enable it and the game will cap its FPS to your display’s refresh rate.
If you are using a high refresh-rate monitor like 120 Hz or higher, then use the Nvidia Control Panel or Nvidia App to limit Monster Hunter Wilds’ max frame rate, and fix the Fatal D3D DXGI_ERROR_DEVICE_HUNG crash.
Nvidia Control Panel
- Open the Nvidia Control Panel. Select “Manage 3D Settings” under “3D Settings”.
- Click the “Program Settings” tab and select Monster Hunter Wilds from the list below.
- Enable “Max Frame Rate” from the options and set a value for it.
- It will fix the in-game crashes.

Nvidia App:
- Open the Nvidia App and select the “Graphics” tab.
- Select “Monster Hunter Wilds” from the list of games.
- Scroll down the options and click on “Max Frame Rate”.
- Turn it on and set a value for it.
- Play MHW and it won’t crash anymore.
Helpful Tip: Make sure you keep the Max Frame Limit to 1/2, 1/3rd, or 1/4th of your monitor’s refresh rate unless you are using a FreeSync or G-Sync display.
Fix #6 – Adjust Windows Timeout Detection and Recovery
Timeout Detection and Recovery (TDR) is a Windows feature that attempts to recover the GPU driver if it freezes. However, the default settings for TDR often result in games crashing with Fatal D3D errors, and Monster Hunter Wilds is no exception. You can fix this issue by tweaking the TDRLevel and TDRDelay, and here is how you can do it:
TDRLevel
You can fix fatal error crashes by creating the TdrLevel file in the Windows Registry that resets the GPU driver when TDR detects a driver stall. Here is how to do it:
- Open “regedit” and run it as an administrator.
- Go to “HKEY_LOCAL_MACHINE -> SYSTEM -> CurrentControlSet -> Control -> GraphicsDrivers”.
- Right-click in the right panel in the ‘blank space’ and Select New In Windows Registry.
- Select DWORD (32-bit) Value and name the file TdrLevel.
- Open the “TdrLevel” file and select Modify.
- Confirm that the value is 0.
- Restart your PC.
TdrDelay
Usually, Windows TDR only waits 2 seconds for the GPU driver to respond. If it takes longer than that, the OS resets the driver, which results in Monster Hunter Wilds crashing with the Fatal D3D error. You can fix the issue by setting up Timeout Detection and Recovery Delay in the Windows Registry, which gives the driver more time to respond or recover.
- Type regedit in Windows search and run it as an administrator.
- Go to “HKEY_LOCAL_MACHINE -> SYSTEM -> CurrentControlSet -> Control -> GraphicsDrivers”.
- Right-click on the right panel in the ‘blank space’ and Select New In Windows Registry.
- Select DWORD (32-bit) Value and name the file TdrDelay.
- Open the “TdrDelay” and select Modify.
- Confirm that the value is 10.
- Restart your PC.
That is all for our fixes for the Fatal D3D crashes in Monster Hunter Wilds. If you are experiencing errors and crashes in games, also see our fixes hub for commonly occurring errors for PC and handhelds.