Ready or Not was limited to Steam Early Access for about two years, and it was expected that the game would not have any issues after its full release on PC. However, as the game runs on Unreal Engine, which doesn’t have a good track record on PC in recent years, it is experiencing errors and issues. Many PC users report that Ready or Not crashes on startup, sometimes accompanied by random error messages. I have compiled a list of fixes that can help you fix this issue on your Windows PC.
6 Working Fixes for Ready or Not is Not Launching on Windows PC
Ready or Not startup crash can happen due to various reasons, such as outdated or broken mods, the game not using discrete graphics hardware on a gaming laptop, damaged system files and missing Visual C++ components, outdated BIOS, and others. I have included these and a couple of other possible fixes to help you avoid Ready or Not startup crashes.
Fix #1 – Update or Remove All Mods
If Ready or Not is not launching after a recent update, then the reason is mods. The mods are either broken or incompatible with the current version of the game. You can verify this by launching Ready or Not in safe mode. If the game does not crash on startup, then you have broken mods installed.
Update the mods to make them compatible with the current version of Ready or Not, or remove them. This is a verified fix, as developers at VOID Interactive have mentioned it themselves. PC users report that removing mods fixes the Ready or Not crashing on startup issue. I have also tried it, and it works perfectly fine.
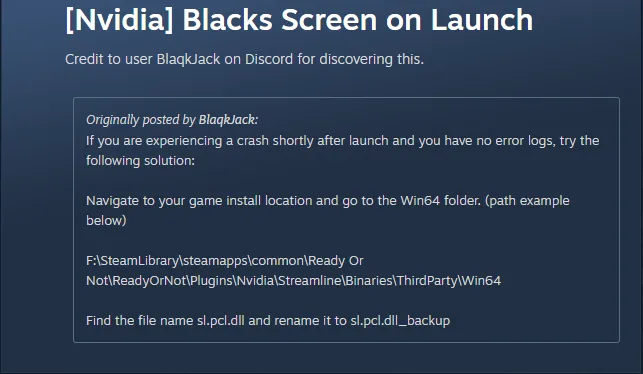
Fix #2 – Rename or Delete sl.pcl.dll
Many PC users report that Ready or Not is crashing at launch with a black screen and without any error messages. To fix these startup crashes, you need to rename a particular file in the game install folder. It is a verified fix, as many PC players have tried it and it worked for them. Follow the steps below to fix the Ready or Not startup crash on Windows PC.
- Open your Steam Library and right-click Ready or Not.
- Go to Manage and click Browse local files.
- Open the “Win64 folder” and search for a file named “sl.pcl.dll”.
- Rename this file “sl.pcl.dll” to “sl.pcl.dll_backup” and exit the folder.
- Run the game, and Ready or Not startup crashes are now fixed.
Fix #3 – Force Ready or Not to Run on Discrete Graphics Hardware
If you are experiencing Ready or Not startup crashes while playing it on a gaming laptop, the reason is that your machine is not using the dedicated graphics card. Tweak graphics settings on your gaming laptop to force Ready or Not to run on discrete graphics hardware, and it will not crash at launch again.
The reason this happens is that gaming laptops use both an integrated GPU (iGPU) and a discrete NVIDIA or AMD graphics card. The Windows switch between the two to save battery and optimize performance.
The game is not launching on your PC because Windows fails to use the discrete graphics card. You can fix Ready or Not startup crashes by forcing the game to use the dedicated graphics card. Here is how you can apply the fix:
- Go to Windows Settings on your gaming laptop, click System, go to Display, and click Graphics.
- Look for “Ready or Not” from the list of apps and programs and click on “Options.”
- Select the “High Performance” option for Ready or Not.
- Apply the changes.
- Ready or Not is not launching on PC errors are now fixed.


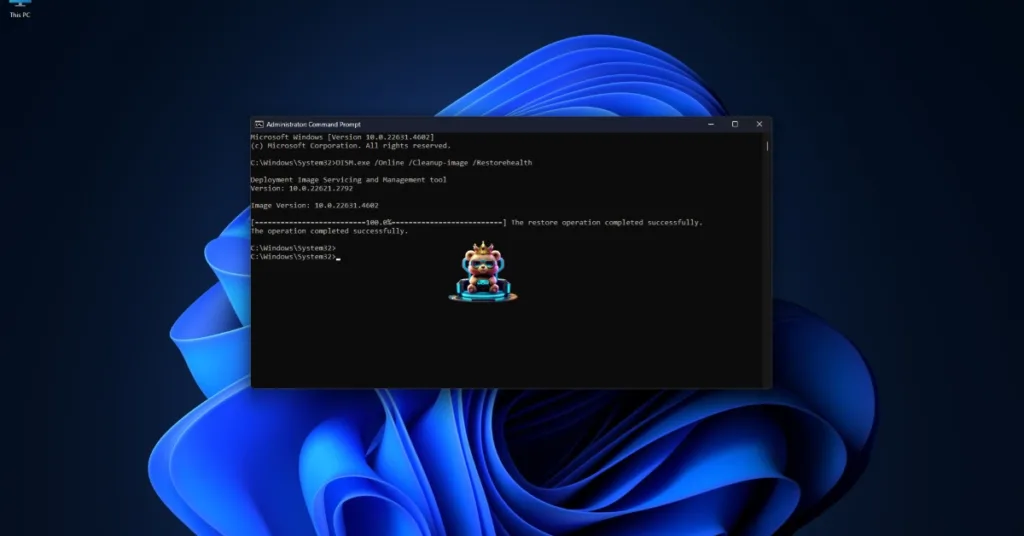
Fix #4 – Repair System Files and Install Missing Visual C++ Components
Visual C++ components are necessary for Windows to run games. If they are missing, corrupt, or broken, games often crash at startup or in-game. Ready or Not is crashing on your Windows 11 PC due to missing Visual C++ components or Windows files. You can fix the game not launching issue by installing or repairing the Visual C++ Components and Windows System files. The latter can be done through SFC and DISM scans. Here is how you can apply this fix to stop Ready or Not from crashing at startup.
Run SFC and DISM Scans
SFC and DISM scans are quite useful for PC users, as they let Windows automatically detect the missing files and repair them. Follow the steps below to run these scans.
- Press the Windows key on your keyboard, type “cmd”, and run Command Prompt as an administrator.
- Type sfc /scannow and hit Enter.
- Windows will run a scan. Let it complete fully.
- After the first scan is complete, type DISM.exe /Online /Cleanup-image /Restorehealth and press Enter again.
- Let Windows complete this scan as well.
- Run Ready or Not now, and it will launch without any errors.
Install or Repair Visual C++ Components
Visual C++ Components are necessary to run games on Windows. They are either missing or broken, which is crashing Ready or Not at launch. You can fix startup crashes by installing or repairing the components.
- Go to your Steam Library and type “Steamworks” in the search bar.
- Right-click “Steamworks Common Redistributables”, go to Manage, and select Browse Local Files.
- In the new window that opens on your screen, open _CommonRedist\vcredist.
- It contains numerous folders with years in their names starting from 2010.
- Open each folder one by one and run VC_redis for both x64 and x86 versions.
- Repair or install the missing Visual C++ components and restart your PC.
- Run Ready or Not, and it will launch without any errors.


Please note that Steam deletes installers after a certain time, and you might find some folders empty. If this is the case, you have to manually download installers for Visual C++ Redistributables and install them. Download and install both x86 and x64 versions.

Fix #5 – Clear NVIDIA Shader Cache and Recompile Shaders
Just like the other Unreal Engine games, Ready or Not also relies heavily on shaders. Many PC users report that Ready or Not crashes with a LowLevelFatalError error message while compiling shaders. The game is crashing because the default shader cache size set by the GPU is too small for the game. To fix the game not launching issue, clear the NVIDIA shader cache and force Ready or Not to recompile shaders. Here is how you can apply this fix:
- Open NVIDIA Control Panel, go to “Manage 3D Settings”, and select the “Global Settings” tab.
- Click the “Shader cache size” option and select the “Disabled” option.
- Hit Apply and restart your PC.
- Go to the “Shader cache size” option again and click the dropdown button.
- Select 10 GB or a higher value and apply the changes.
- Run Ready or Not; the game will recompile the shaders, and the startup crash is now fixed.

Fix #6 – Update BIOS or Underclock Your CPU
Issues with Raptor Lake CPUs (Intel’s 13th and 14th generation CPUs) are quite common and even acknowledged by Intel itself. Ready or Not is crashing at startup because of these CPUs, as they have some technical issues, and they are more common when it comes to games running on Unreal Engine 5.
Many PC users suggest in the community to download the latest BIOS update (at least August 2024+). This will enable it to receive code changes, and the chip will regulate its power. It will fix the error.
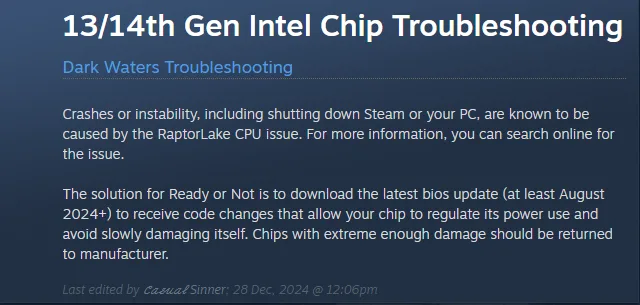
However, if the processor is damaged prior to the update, updating the BIOS will not fix the Ready or Not startup crash on your Windows PC. If this is the case with you, underclock your CPU’s performance core ratio with the help of the following steps:
- Download and install Intel Extreme Tuning Utility on your PC.
- Open it and set the Performance Core Ratio to 50x. Save the changes.
- Play Ready or Not, and it will launch without crashing at startup.
There you have it, guys. I have explained all of the possible reasons behind the Ready or Not startup crash issue. If you are facing similar or other errors while playing other PC games, head over to our hub for the commonly occurring PC errors and their fixes.